이야기박스
Chapter 2. Architecture and flow 본문

# 개요
Apache Spark의 Mental Model을 코드 예제를 통하여 알아보는 챕터입니다.
예제를 통하여 Spark, 나아가서 Big Data 처리에서 Mental Model이 어떤지 확인해 보도록 합시다.
## 참고, 멘탈 모델이란?
Mental model - Wikipedia
From Wikipedia, the free encyclopedia Jump to navigation Jump to search Explanation of someone's thought process about how something works in the real world A mental model is an explanation of someone's thought process about how something works in the real
en.wikipedia.org
멘탈 모델이란 어떠한 목적을 달성하기 위한 과정을 도식화하는 것으로 이해하면 될 것 같습니다.
책에서 소개하는 Spark에서 Mental Model은 다음과 같습니다.
In terms of software, a mental model is a conceptual map that you can use to plan, predict, diagnose, and debug your applications.
Big Data : overall architecture, flows, and terminology
# Summary
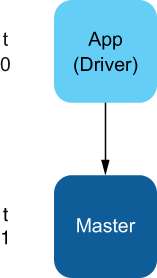
- Application == Driver 입니다. 데이터는 Driver로 들어가지 않고 원격의 Worker로 들어가게 됩니다.
- Driver는 Master와 세션(SparkSession)을 생성합니다. 세션은 Worker Node의 Life Cycle을 정의하게 됩니다.
- Master는 Remote Cluster 이외에도 Local 모드로 실행할 수 있습니다. Local 모드로 실행하면 클러스터 구성이 필요하지 않아 간편한 개발환경을 제공해줍니다.
- 데이터는 Worker Node에 Partition에 분할되어 처리됩니다. 여기서 Partition은 각 Worker Node Memory에 위치하게 됩니다.
- Spark는 작업 요청이 있어야만 동작하는 lazy pattern을 지향합니다. (Chapter 4)
- Spark API는 Chaining Method가 많습니다. (NPE 주의)
# 예제를 통한 Mental model 학습
아래의 CSV to RDB ; ETL 프로세스를 통하여 Spark의 전체 아키텍처를 살펴보도록 하겠습니다.
목표 : csv 파일에서 제공하는 성과 이름을 합쳐서 풀네임을 RDB에 저장
## Sample CSV
lname,fname
Pascal,Blaise
Voltaire,François
Perrin,Jean-Georges
Maréchal,Pierre Sylvain
Karau,Holden
Zaharia,Matei

## Java code
public class CsvToRelationalDatabaseApp {

  /**
   * main() is your entry point to the application.
   *
   * @param args
   */
  public static void main(String[] args) {
    CsvToRelationalDatabaseApp app = new CsvToRelationalDatabaseApp();
    app.start();
  }

  /**
   * The processing code.
   */
  private void start() {
    // Creates a session on a local master
    SparkSession spark = SparkSession.builder()
        .appName("CSV to DB")
        .master("local")
        .getOrCreate();

    // Step 1: Ingestion
    // ---------

    // Reads a CSV file with header, called authors.csv, stores it in a
    // dataframe
    Dataset<Row> df = spark.read()
        .format("csv")
        .option("header", "true")
        .load("data/authors.csv");

    // Step 2: Transform
    // ---------

    // Creates a new column called "name" as the concatenation of lname, a
    // virtual column containing ", " and the fname column
    df = df.withColumn(
        "name",
        concat(df.col("lname"), lit(", "), df.col("fname")));

    // Step 3: Save
    // ---------

    // The connection URL, assuming your PostgreSQL instance runs locally on
    // the
    // default port, and the database we use is "spark_labs"
    String dbConnectionUrl = "jdbc:postgresql://localhost/spark_labs";

    // Properties to connect to the database, the JDBC driver is part of our
    // pom.xml
    Properties prop = new Properties();
    prop.setProperty("driver", "org.postgresql.Driver");
    prop.setProperty("user", "jgp");
    prop.setProperty("password", "Spark<3Java");

    // Write in a table called ch02
    df.write()
        .mode(SaveMode.Overwrite)
        .jdbc(dbConnectionUrl, "ch02", prop);

    System.out.println("Process complete");
  }
}
## Step 0. Master 연결
Driver(Application)는 Master와 연결하여 SparkSession을 맺습니다.
아래 예시는 local 모드로 접속을 하는 예시이고, 다른 master 사용하는 내용은 Chapter 5,6에서 다루게 됩니다.
SparkSession spark = SparkSession.builder()
         .appName( "CSV to DB" )
         .master( "local" )
         .getOrCreate();

## Step 1. Ingesting (Extract)
ETL의 Extract, 즉 데이터를 추출하는 과정입니다.
Loading, Ingesting, Reading 등등.. 비슷한 의미의 용어로 많이 불리기도 합니다.
Dataset<Row> df = spark .read()
         .format( "csv" )
         .option( "header" , "true" )
         .load( "data/authors.csv" );
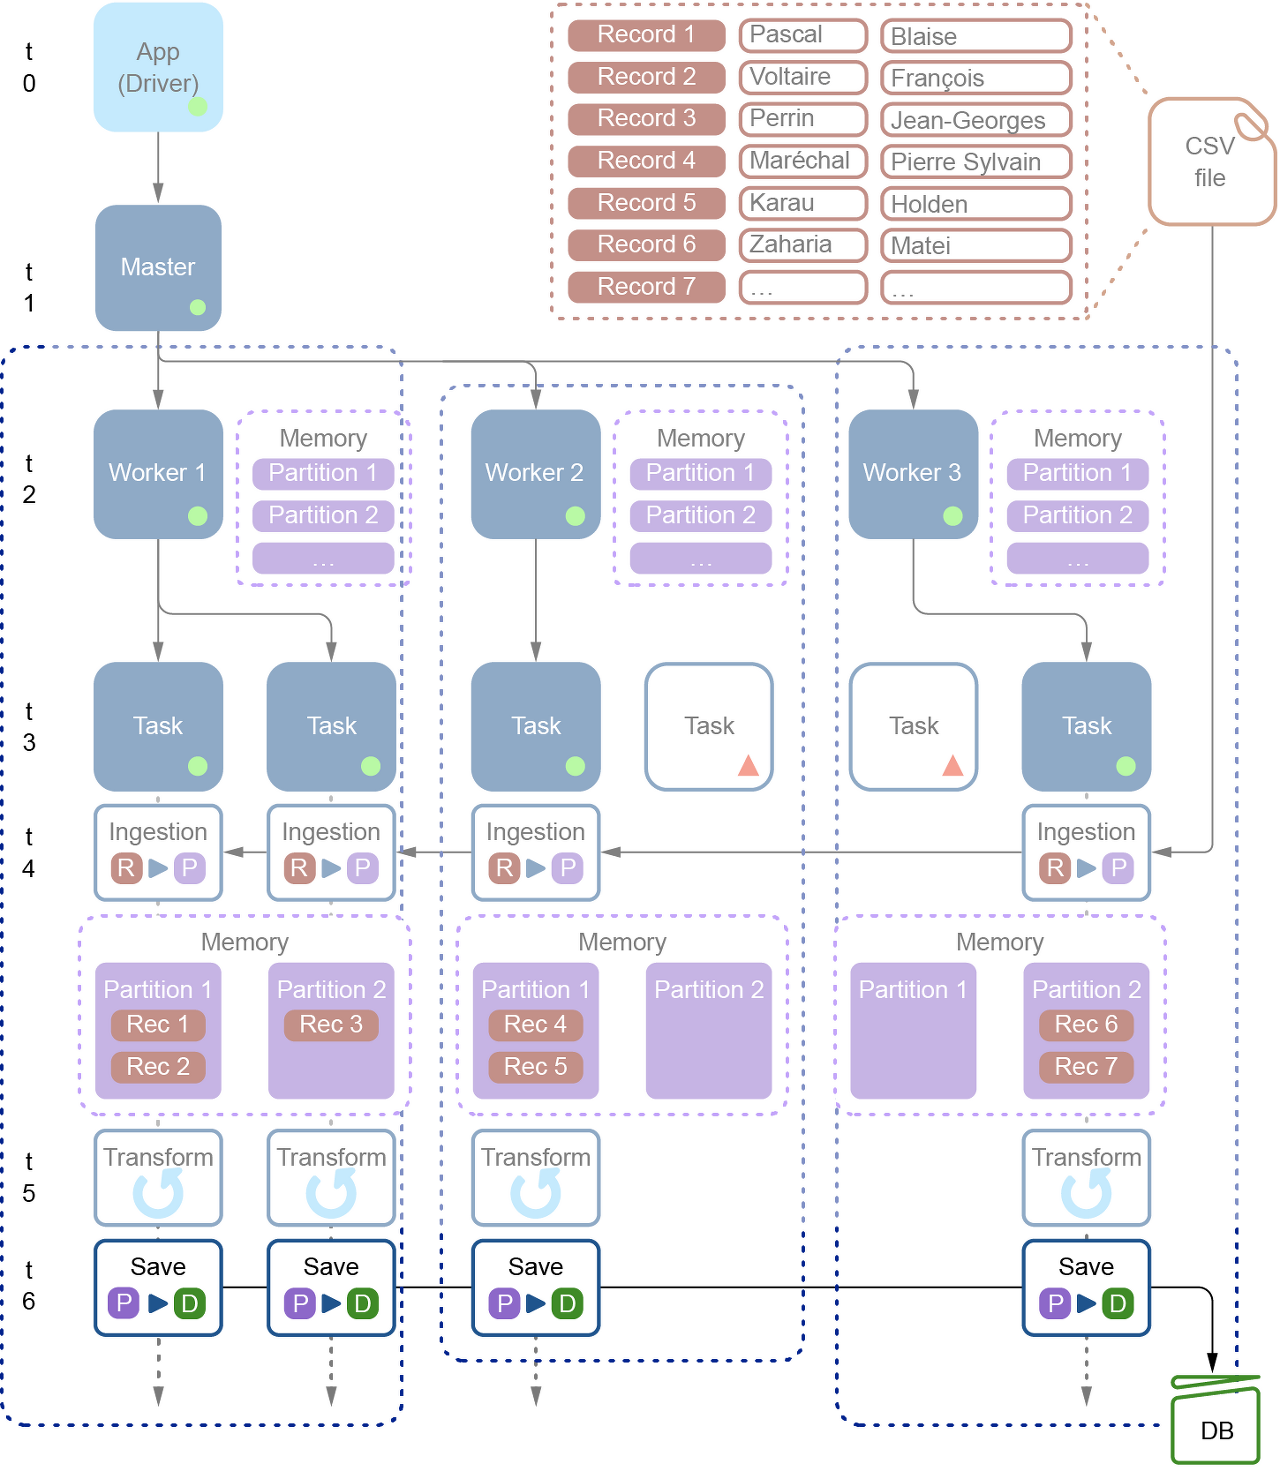
Spark에서 데이터는 클러스터의 Workers(Slaves)라 불리는 노드에서 분할하여 읽을 수 있습니다.

위와 같이 분산되어 파일을 읽으려면 원본 파일이 분산 파일 시스템 혹은 공유 파일 시스템에 파일이 위치하여야 합니다. 그렇지 않으면 단일 노드에서 파일을 읽고 처리하게 됩니다.
만약 분산으로 처리하게 되는 경우, 각 워커별 할당량은 워커 노드의 메모리에 의해 결정됩니다.

이후, 데이터를 각 Task에서 읽고 특정 파티션에 저장을 하게 됩니다.

[R > P] : Record to Partition
참고로 위 그림의 [Rec 1]은 csv 파일의 첫 번째 row인 'Pascal, Blaise'입니다.
WHY SHOULD YOU CARE ABOUT PARTITIONS AND THEIR LOCATIONS?
여러 DataSet을 합치는 것은 비용이 꽤 큼. 초기에 데이터를 분할하여 가져올 수 있다면 효율적으로 돌 수 있음
* DataSet 통합 : Chapter 12, 13
* Repartition : Chapter 17
## Step 2. Transform
ETL의 Transform, 데이터 가공을 하는 과정입니다.
아래는 'lname', 'fname'이라는 필드를 합쳐서 Fool Name을 출력하는 Transform 작업을 하는 코드입니다.
df = df .withColumn("name" ,concat( df .col( "lname" ), lit( ", " ), df .col( "fname" )));

Spark is Lazy
동작의 최적화를 위해서 Lazy 한 코드가 많습니다. Chapter 4에서 다시 나오니 그때 자세하게 살펴보도록 합시다.
## Step 3. Save (Loading)
ETL의 Load, 데이터 저장을 하는 과정입니다.
Transforming된 데이터를 postgresql에 저장하는 코드입니다.
String dbConnectionUrl = "jdbc:postgresql://localhost/spark_labs" ;
     Properties prop = new Properties();
     prop .setProperty( "driver" , "org.postgresql.Driver" );
     prop .setProperty( "user" , "jgp" );
     prop .setProperty( "password" , "Spark<3Java" );
     df .write()
         .mode(SaveMode. Overwrite )
         .jdbc( dbConnectionUrl , "ch02" , prop );
[P > D] : Partition to Database
Question. returns to the application: no data has ever been transferred from the worker to the application.
==> write하고 flush 되어서 메모리에 데이터가 없어지는 건가??
## 전체 프로세스 정리
- Dataset은 Application(Driver)에 들어가는 것이 아닌 Worker의 Partition으로 들어가게 됩니다.
- 모든 프로세스는 Worker에서 돌아가게 됩니다.
- Task 숫자만큼 DB에 Connection이 생성이 될 텐데, 이를 컨트롤하기 위한 수단은 Chapter 17에서 배울 수 있습니다.
# 참고, Python 및 Scala 코드
## Python
from pyspark.sql import SparkSession
from pyspark.sql import functions as F
import os

current_dir = os.path.dirname(__file__)
relative_path = "../../../../data/authors.csv"
absolute_file_path = os.path.join(current_dir, relative_path)

# Creates a session on a local master
spark = SparkSession.builder.appName("CSV to DB").master("local").getOrCreate()

#  Step 1: Ingestion
#  ---------
#
#  Reads a CSV file with header, called authors.csv, stores it in a dataframe
df = spark.read.csv(header=True, inferSchema=True, path=absolute_file_path)

# Step 2: Transform
# ---------
# Creates a new column called "name" as the concatenation of lname, a
# virtual column containing ", " and the fname column
df = df.withColumn("name", F.concat(F.col("lname"), F.lit(", "), F.col("fname")))

# Step 3: Save
# ----
#
# The connection URL, assuming your PostgreSQL instance runs locally on the
# default port, and the database we use is "spark_labs"
dbConnectionUrl = "jdbc:postgresql://localhost/spark_labs"

# Properties to connect to the database, the JDBC driver is part of our pom.xml
prop = {"driver":"org.postgresql.Driver", "user":"jgp", "password":"Spark<3Java"}

# Write in a table called ch02
df.write.jdbc(mode='overwrite', url=dbConnectionUrl, table="ch02", properties=prop)

# Good to stop SparkSession at the end of the application
spark.stop()
## Scala
  def main(args: Array[String]): Unit = {

    // Creates a session on a local master
    val spark = SparkSession.builder
      .appName("CSV to DB")
      .master("local[*]")
      .getOrCreate

    // Step 1: Ingestion
    // ---------
    // Reads a CSV file with header, called authors.csv, stores it in a
    // dataframe
    var df = spark.read.format("csv")
      .option("header", "true")
      .load("data/authors.csv")


    // Step 2: Transform
    // ---------
    // Creates a new column called "name" as the concatenation of lname, a
    // virtual column containing ", " and the fname column
    df = df.withColumn("name", concat(col("lname"), lit(", "), col("fname")))

    // Step 3: Save
    // ----
    // The connection URL, assuming your PostgreSQL instance runs locally on
    // the
    // default port, and the database we use is "spark_labs"
    val dbConnectionUrl = "jdbc:postgresql://localhost/spark_labs"

    // Properties to connect to the database, the JDBC driver is part of our
    // pom.xml
    val prop = new Properties
    prop.setProperty("driver", "org.postgresql.Driver")
    prop.setProperty("user", "jgp")
    prop.setProperty("password", "Spark<3Java")

    // Write in a table called ch02
    df.write.mode(SaveMode.Overwrite).jdbc(dbConnectionUrl, "ch02", prop)


    // Good to stop SparkSession at the end of the application
    spark.stop

    println("Process complete")
}'Computer & Data > Big Data' 카테고리의 다른 글
| Chapter 6. Deploying your simple app (0) | 2020.07.30 |
|---|---|
| Chapter 5. Building a simple app for deployment (0) | 2020.07.30 |
| Spark in action, 2nd edition study (0) | 2020.07.16 |
| [Flume] No configuration found for this host:** (0) | 2020.06.19 |
| Kafka ; linger time callback (0) | 2020.06.08 |


